
Cute and Vibrant Acrylic Nail Ideas 2023
Source: youhavestyle.com
Summer is the perfect time to get creative with your nail art. There are plenty of fun and creative summer nail ideas to try out! Here are a few popular ones:
Bright colors: Summer is the perfect time to experiment with bold and bright colors. Here are some fun and vibrant bright color nail ideas:
Neon pink: A bright and bold pink color will make a statement on any skin tone.
Coral: A mix of orange and pink, coral is a perfect shade for a summery look.
Turquoise: This blue-green color is reminiscent of the ocean and is perfect for a beach vacation or a summer day.
Lime green: A bright green hue will add a pop of color to any outfit.
Yellow: A sunny and cheerful shade, yellow nails are sure to brighten up your day.
Bright orange: This bold and vibrant color will add an energetic touch to your nails.
Electric blue: A fun and striking blue shade will make your nails stand out.
Purple: A bright purple color is perfect for those who want a bold look without being too loud.
Red: A classic and timeless color, red nails are perfect for any occasion.
Remember, with bright color nails, you can mix and match different shades or add glitter and patterns for a fun and unique look.
Ombré: Ombre nails are always on trend, and they're especially perfect for summer. They are a popular nail trend that involves blending two or more colors seamlessly into each other. Here's how to achieve ombré nails:

Start with a base coat: Apply a base coat to your nails to protect them from staining and to help the polish adhere better.
Choose your colors: Select two or more nail polish colors that complement each other well. It's best to choose colors that are within the same family, such as blues or pinks.
Apply the lightest shade: Apply the lightest shade of polish to your entire nail. Apply two coats if necessary, allowing each coat to dry completely.
Create the gradient: On a makeup sponge, apply a stripe of each polish color next to each other, making sure they slightly overlap. Then, dab the sponge onto your nail, blending the colors together until you achieve the desired ombré effect. You may need to repeat this step a few times until you get the perfect gradient.
Finish with top coat: Once you've achieved the ombré effect, let your nails dry completely, then apply a top coat to seal in your design and add extra shine.
Tips:
To achieve a more subtle ombré effect, use colors that are closer in shade.
Experiment with different color combinations and techniques, such as diagonal or vertical gradients.
If you make a mistake, you can use a small brush dipped in nail polish remover to clean up any smudges or mistakes.
Floral designs: Flowers are a classic summer motif. Here are some steps to create your own floral design nails:

Start with a base coat: Apply a clear or neutral base coat to your nails to protect them from staining and to help the polish adhere better.
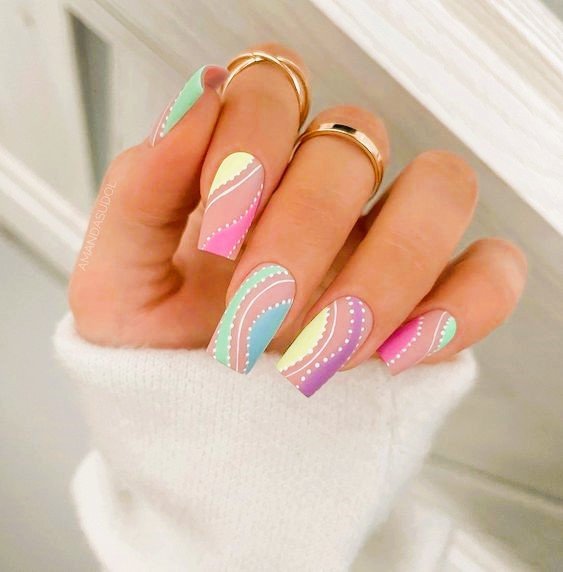
Choose your colors: Select a few nail polish colors that complement each other and are reminiscent of flowers. Pastel shades such as pinks, purples, and yellows work well for a soft and feminine look.
Create the flowers: Use a small nail art brush or a toothpick to create flowers on your nails. Dip the brush or toothpick into the nail polish and create small dots in a circular pattern. Then, drag the brush or toothpick from the center of the dots outwards to create petals.
Add leaves: Using a small brush, create leaves around the flowers. Dip the brush in green polish and create small lines that branch out from the flowers.
Finishing touches: Once you've created your floral designs, let your nails dry completely. Then, add a clear top coat to seal in your design and add extra shine.
Tips:
Experiment with different flower shapes and sizes to create a variety of designs.
Add a touch of glitter or metallic polish to create dimension and sparkle to your floral design.
You can also use nail art stickers or decals to create intricate floral designs easily.


Fruit-themed nails: Summer is the season for fresh fruit, so why not celebrate it on your nails? Here are some steps to create your own fruit-themed nails:
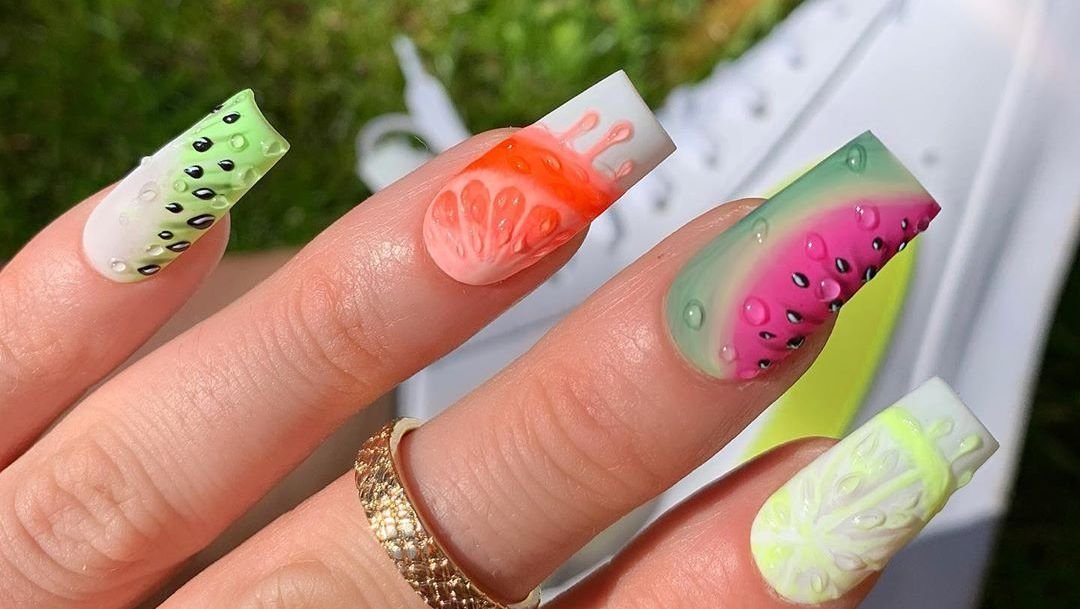
Start with a base coat: Apply a clear or neutral base coat to your nails to protect them from staining and to help the polish adhere better.
Choose your fruit: Select a few nail polish colors that complement the fruit you want to feature on your nails. For example, you might choose green for kiwis, yellow for lemons, or red for strawberries.
Create the fruit: Use a small nail art brush or a toothpick to create the fruit on your nails. For example, you could use small dots and lines to create the texture of a kiwi or use a large red dot for a strawberry.
Add details: Once you've created the fruit, add details such as seeds, stems, or leaves. Use a small brush to create these details in a complementary color.
Finishing touches: Once you've created your fruit-themed designs, let your nails dry completely. Then, add a clear top coat to seal in your design and add extra shine.
Tips:
Experiment with different fruit designs and colors to create a variety of looks.
Add a touch of glitter or metallic polish to create dimension and sparkle to your fruit-themed design.
Use a matte top coat to create a more subtle and sophisticated look.
Glitter: Sparkly nails are always a hit, and they're especially fun during the summer. Here are some steps to create your own glitter nails:

Start with a base coat: Apply a clear or neutral base coat to your nails to protect them from staining and to help the polish adhere better.
Choose your glitter: Select a glitter nail polish or loose glitter in your desired color. You can also mix and match different colors for a more vibrant look.
Apply the glitter: Using the glitter polish brush or a small brush, apply the glitter polish to your nails. If you're using loose glitter, you can mix it with clear polish to create a glittery polish. Apply a thin layer of glitter polish to each nail, or you can apply it to just the tips or a specific area of your nails.
Let it dry: Once you've applied the glitter, let your nails dry completely before applying a second coat.
Apply a topcoat: Once the glitter is dry, apply a clear top coat to seal in the glitter and add extra shine.
Tips:
Use a makeup sponge to apply loose glitter for a more even and concentrated application.
To remove glitter nail polish easily, soak a cotton ball in nail polish remover and place it on your nails, then wrap each finger in foil. Let it sit for a few minutes, then remove the foil and cotton ball and the glitter should come off easily.
Experiment with different glitter shapes, sizes, and colors for a unique and personalized look.

source: womenshealth.com
Beach-inspired nails: If you're headed to the beach this summer, why not create nails that match the ocean and sand? Here are some steps to create your own beach-inspired nails:
Start with a base coat: Apply a clear or neutral base coat to your nails to protect them from staining and to help the polish adhere better.
Choose your colors: Select nail polish colors that remind you of the beach. For example, you might choose shades of blue for the ocean, beige for sand, or coral for shells.
Create the design: There are many different beach-inspired designs you can create on your nails. You can paint waves, palm trees, beach umbrellas, or seashells. You can also create a gradient effect by blending different shades of blue or other beachy colors.
Add texture: To add more interest to your beach-inspired nails, you can add texture using sand or glitter. You can sprinkle sand on wet polish and then let it dry, or you can apply glitter polish on top of your design.
Finishing touches: Once you've created your beach-inspired design, let your nails dry completely. Then, add a clear top coat to seal in your design and add extra shine.
Tips:
Use nail art brushes and toothpicks to create intricate designs and details, such as palm tree fronds or seashell patterns.
Add some sparkle with glitter nail polish or rhinestones for a more glamorous beach look.
Experiment with different color combinations and designs to create a unique and personalized beach-inspired manicure.
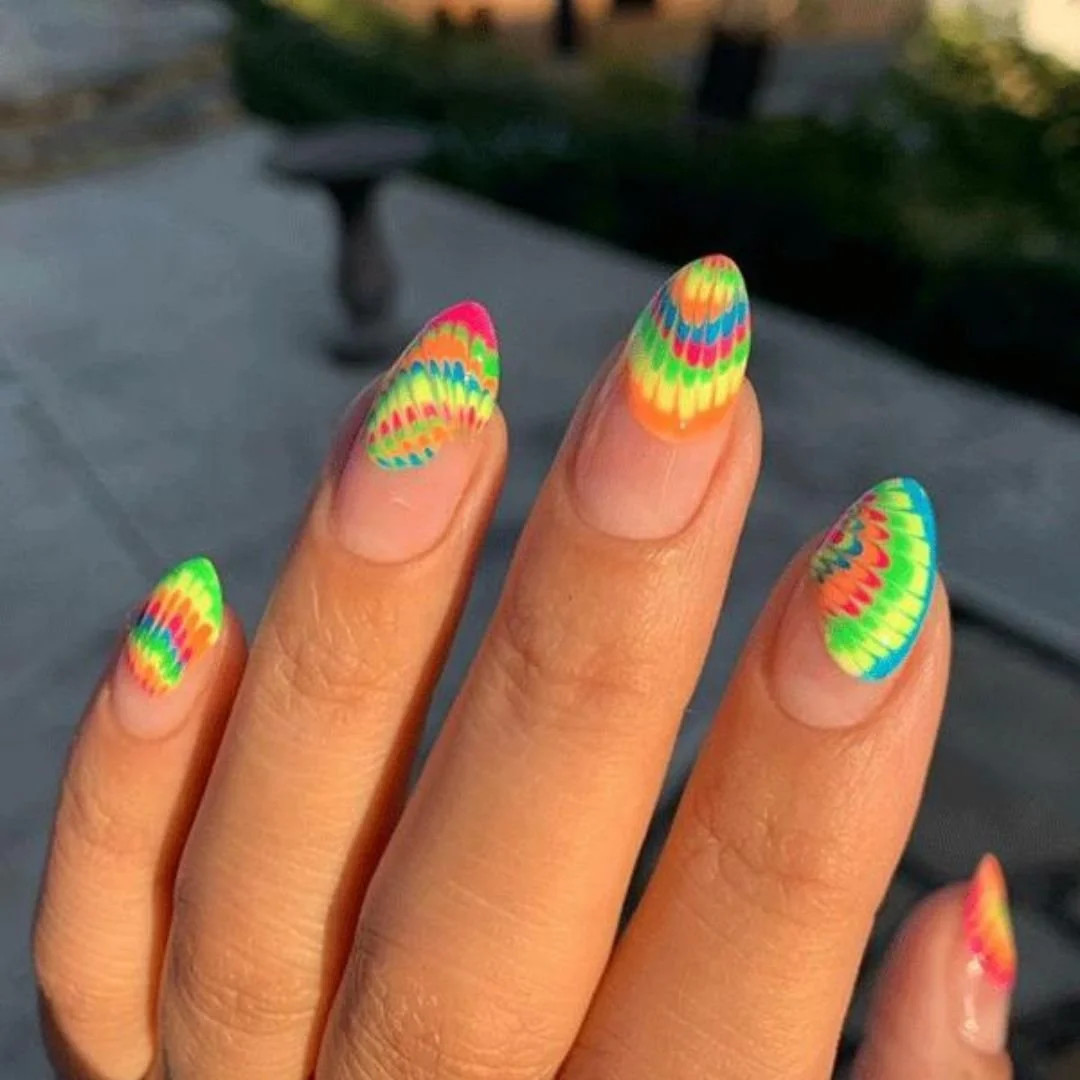
Tie-dye: Tie-dye is a huge trend right now, and it's a great way to add a fun and colorful twist to your nails. Here are some steps to create your own tie-dye nails:
Start with a base coat: Apply a clear or neutral base coat to your nails to protect them from staining and to help the polish adhere better.
Choose your colors: Select nail polish colors that you want to use for your tie-dye design. You can choose a few colors that complement each other or opt for a rainbow effect with many different colors.
Apply the base colors: Apply your chosen colors to your nails in a random and splotchy pattern. It's okay if the colors overlap and blend together.
Create the tie-dye effect: To create the tie-dye effect, you can use a small brush, toothpick, or sponge to swirl and blend the colors together. You can also use plastic wrap to create a marbling effect by pressing it onto your nails while the polish is still wet.
Finishing touches: Once you've created your tie-dye design, let your nails dry completely. Then, add a clear top coat to seal in your design and add extra shine.
Tips:
Use complementary colors for a more cohesive and polished look, or go for a rainbow effect for a more fun and playful look.
Experiment with different techniques to create your tie-dye effect, such as using a sponge to blend the colors or using plastic wrap for a marbling effect.
Add some sparkle with glitter nail polish or rhinestones for a more glamorous tie-dye look.
These are just a few ideas to get you started. Remember, the sky's the limit when it comes to summer nail art!
Halloween is in the air and it is time for a dress-up! This year, you can let your pet join in the fun with these adorable costumes.